
*********************************************************************
Materials:
- Himalaya dolphin baby yarn (about 2.5 skeins)
- Hook number 4
- Bead Eyes
- Spout: YarnArt BABY. Hook number 2 (Nose scratched, so he is so fluffy)
Abbreviations (US Terms):
- ch – chain
- st(s) – stitch(es)
- sc – single crochet
- inc – increase (2sc in one st)
- dec – decrease (2sc together)
- blsc – back loop single crochet
- flsc – front loop single crochet
- dctog – double crochet together
- sl st – slip stitch
- F.o. = finish off
- [..] – total number of sts
- [ ] x 6 = repeat whatever is between the brackets the number of times stated
*******************************************************************
Instructions:
- R1 : Work 4 sc in a magic circle. Join to first sc with sl st. [4]
- R 2: inc x 4 [8]
- R 3: inc, sc, inc*3, sc, inc*2 [12]
- R 4: sc, inc, sc*3, inc, [sc, inc]*2, sc*3, inc [19]
- R 5-9: sc *19 [19]
- R 10: sc*7, dec, sc, dec, sc*7 [17]
- R 11: sc*4, dec*2, sc, dec*2, sc*4 [13]
- R 12-21: sc *13 [13]
- R22: 2 sc. Do not end the series to the end. Stuffing, fold together. For each loop on both sides sc. Fasten off.
Legs
- R1 : Work 7 sc in a magic circle. Join to first sc with sl st. [7]
- R 2:
5sctog, sc*3, turn, 4sctog, inc[14] -> Inc *7 [Got many messages so change it for easier understanding.] - R 3: inc, sc*4, inc*3, sc*4, inc*2 [20]
- R 4: sc, inc, sc*5, inc, sc*3, inc, sc*5, inc, sc*2 [24]
- R 5: sc*2, inc, [sc*5, inc]*3, inc, sc*3 [30]
- R 6: [sc, inc]*2, sc*5, inc, sc, inc, sc*3,inc,sc,inc,sc*5,inc,sc,inc, sc*2 [36]
- R 7: scbl*36 [36]
- R 8-9: sc*36 [36]
- R 10: sc*9, dec, [sc, dec]*5, sc*8, dec [29]
- R 11: sc*8, dec*2, sc*3, dec*2, sc*8, dec [24]
- R 12: sc*8, dec*4, sc*8 [20]
- R 13: sc*6, dec*4, sc*4, dec, sc*6 [18]
- R 14: sc*7, dec*2, sc*7 [16]
- R 15-24: sc *16 [16]
- R 25. 2 sc. Do not end the series to the end. Add stuffing, fold together. For each loop on both sides sc. Fasten off.
Ears
- R 1: mc with 6 st [6]
- R 2: inc * 6 [12]
- R 3: [1 sc, inc] x 6 [18]
- R 4: [2 sc, inc] x 6 [24]
- R 5: [3 sc, inc] x 6 [30]
- R 6: [4 sc, inc] x 6 [36]
- R 7: [5 sc, inc] x 6 [42]
- R 8-12: 42 sc [42]
- R 13: [5 sc, dec] x 6 [36]
- R 14-18: 36 sc [36]
- R 19: [4 sc, dec] x 6 [30]
- R 20-24: 30 sc [30]
- R 25: [3 sc, dec] x 6 [24]
- R 26-30: 24 sc [24]
- R 31: [2 sc, dec] x 6 [18]
- R 32-36: 18sc [18]
- R 37: [sc, dec] x 6 [12]
- R 38-42: 12 sc [12Ears do not fill. Put the edges together. For each loop on both sides knit sbn. Fasten and cut the thread.

Nose [Pink]
- R 1: mc with 6 st [6]
- R 2: inc * 6 [12]
- R 3: [1 sc, inc] x 6 [18]
- R 4: [2 sc, inc] x 6 [24]. Finish, leave the thread for sewing .
Body in one Piece
- R 1: magic ring with 6 st [6]
- R 2: inc * 6 [12]
- R 3: [1 sc, inc] x 6 [18]
- R 4: [2 sc, inc] x 6 [24]
- R 5: [3 sc, inc] x 6 [30]
- R 6: [4 sc, inc] x 6 [36]
- R 7: 36 sc [36]
- R 8: [5 sc, inc] x 6 [42]
- R 9: [6 sc, inc] x 6 [48]
- R 10-16: 48 sc [48]
- R 17: [6 sc, dec] x 6 [42]
- R 18: [5 sc, dec] x 6 [36]
- R 19: 3 sc, dec* 6, 21 sc [30] — here tummy
- R 20-23: 30 sc [30]
- R 24: [3 sc, dec] x 6 [24]
- R 25: 24 sc [24]
- R 26: dec*12 [12]
- R 27: inc*12 [24] — here head
- R 28: [sc, inc] x 12 [36]
- R 29: [5sc, inc] x 6 [42]
- R 30: [6sc, inc] x 6 [48]
- R 31: [7sc, inc] x 6 [54]
- R 32: [8sc, inc] x 6 [60]
- R 33-37: 60 sc [60]
- R 38: [8sc, dec] x 6 [54]
- R 39: [7sc, dec] x 6 [48]
- R 40: [6sc, dec] x 6 [42]
- R 41: 42 sc [42]
- R 42: [5sc, dec] x 6 [36]
- R 43: [4sc, dec] x 6 [36]
- R 44: 30 sc [30]
- R 45: [3sc, dec] x 6 [24]
- R 46: 24 sc [24]
- R 47: [sc, dec] x 8 [16]
- R 48: dec * 8, pull and fasten off.

Assembly
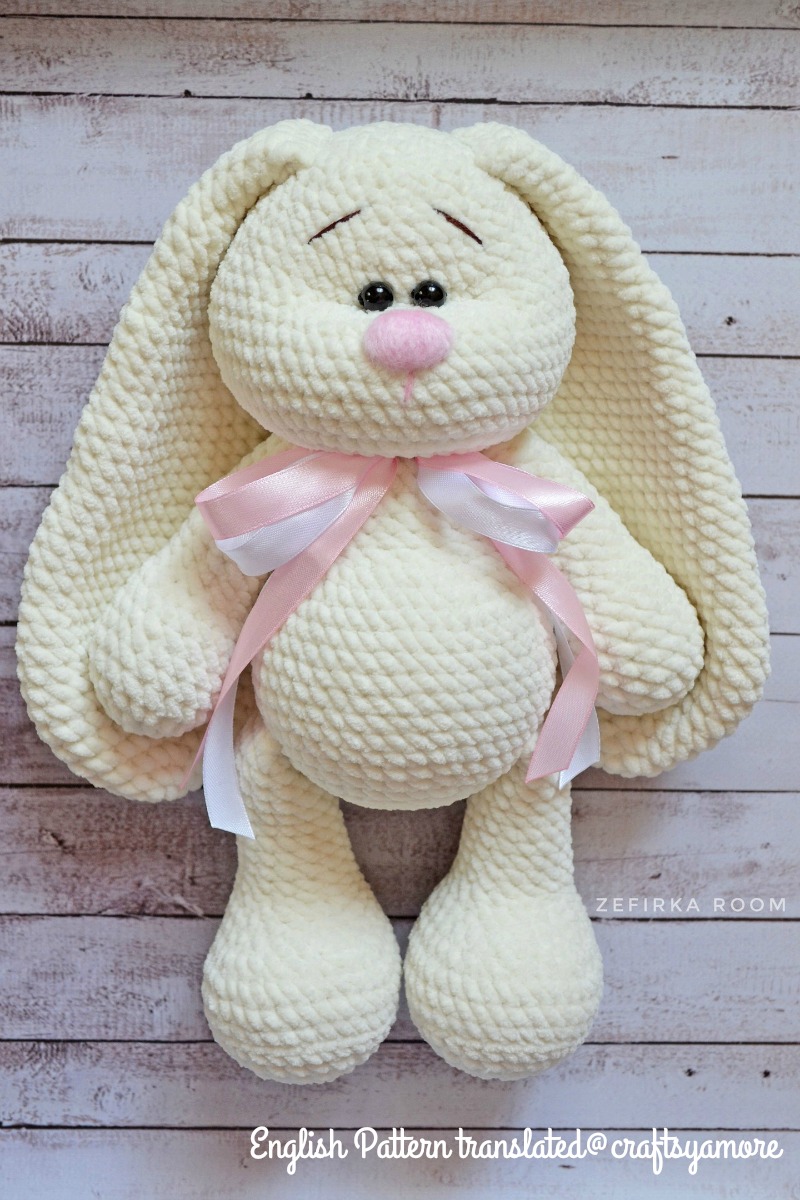
* Sew eyes between 40-41 rows, at a distance of 2-3 sts.
* Making a snout muzzle. We insert the needle between the 26th and 27th rows (where we have 12 inc and 12 dec), through to the 40th row with eyes. The needle entrance and its exit are next to each other so that the thread does not slip into the web. In this way, we make several stitches, pulling down When we are satisfied with the result, we tie a bundle, we hide the tail.
* Sew a spout between 34-37 rows of the head
* Sew on ears at the level of 44 rows of the head
* Sew on the upper legs at the level of 24 rows of a calf
* Sew on the lower legs at the level of 8 rows of a calf
* Embroider the edge.
XOXO, Angelina
*******************************************************************
Thank you for sharing my patterns and tutorials. When you do, it helps support this site and my ability to create more free patterns.
********************************************************************


