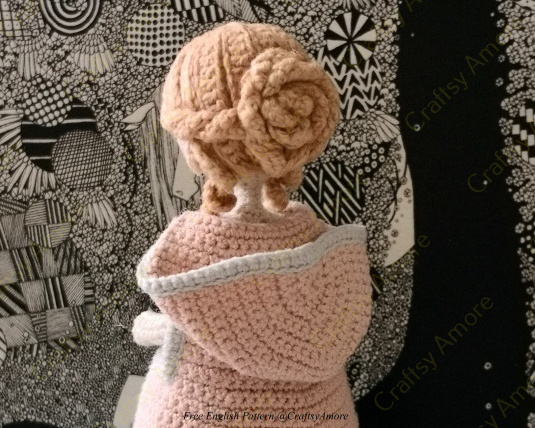
Sorry, friends, I was totally occupied by chores since kids start their school and It takes me time to get used to everything. Many friends has asked for the cape for the Amigurumi Princess Doll in Cape Crochet Free Pattern I shared, and actually there is the hair part missing, too. And here it continues. It’s easy for beginners to try after learning basic single, single crochet increase and decrease for basic Amigurumi crochet. Everyone likes toys and especially soft and puffy ones. I shared the cabbage doll is cute addition to desk, or hanging accessories for wall or bag, key chains. This princess doll is originally designed by zichin, inspired from TV Once Upon A Time. They were and always will be the most desirable and enjoyable entertainment for each and every child and not only for them, even we and personally me often enjoy having fun with these beautiful toys.
Amigurumi Doll
Disclaimer: This site is sponsored with affiliate links.
Yarn: Light Pink; Start from ch 19. Then Turn Over for each row.
R 1: crochet backward, sc *2, inc, sc, inc, sc in next 8 st, inc, sc, inc, sc*2 [22]
R 2: sc in next 11 st, inc, sc in next 10 st [23]
R 3: sc in next 6 st, inc, sc in next 9 st, inc, sc in next 6 st [25]
R 4: sc in all 25 sts [25]
R 5: sc in next 7 st, inc, sc in next 9 st, inc, sc in next 7 st [27]
R 6: sc in all 27 sts [27]
R 7: sc in next 8 st, inc, sc in next 9 st, inc, sc in next 8 st [29]
R 8: sc in all 29 sts [29]
Now Be sure to crochet the LF [Left Front Part], Back, RF [ Right Front] seperately
LF [Left Front Part]
R 9: inc, sc in next 2 st [4]
R 10-13: sc in all 4 sts [4]
R 14: sc in next 3 st, inc [5]
R 15-18: sc in all 5 sts [5]
Back
R 9: sk 2 ch from front, sc in next 9 st, sk 2 ch from front [19]
R 10: sc in next 4 st, inc, sc in next 9 st, inc, sc in next 4 st [21]
R 11: sc in all 21 sts [21]
R 12: sc in next 10 st, inc, sc in next 10 st [22]
R 13: sc in all 22 sts [21]
R 14: sc in next 11 st, inc, sc in next 10 st [23]
R 15: sc in all 23 sts [23]
R 16: sc in next 11 st, inc, sc in next 11 st [24]
R 17: sc in all 24 sts [24]
R 18: sc in next 12st, inc, sc in next 11 st [25]
RF [Right Front Part]
R 9: sc in next 2 sts, inc [4]
R 10-13: sc in all 4 sts [4]
R 14: inc, sc in next 3 sts [5]
R 15-18: sc in all 5 sts [5]
Now Join LF, Back and RF as one part of cloak
R 19: sc in next 5 st, ch 2, sc in next 5 st, inc, sc in next 13 st, inc, sc in next 5 st, ch 2, sc in next 5 st [41]
R 20: sc in all 41 sts [25]
R 21: sc in next 20 st, inc, sc in next 20 st [42]
R 22: sc in all 42 sts [42]
R 23: sc in next 13 st, inc, sc in next 14 st, inc, sc in next 13 st [44]
R 24: sc in all 44 sts [44]
R 25: sc in next 22 st, inc, sc in next 21 st [45]
R 26: sc in all 45 sts [45]
R 27: sc in next 14 st, inc, sc in next 15 st, inc, sc in next 14 st [47]
R 28: sc in all 47 sts [47]
R 29: sc in next 23 st, inc, sc in next 23 st [48]
R 30: sc in all 48 sts [48]
R 31: sc in next 15 st, inc, sc in next 16 st, inc, sc in next 15 st [50]
R 32: sc in all 50 sts [50]
R 33: sc in next 25 st, inc, sc in next 24 st [51]
R 34: sc in all 51 sts [51]
R 35: sc in next 16 st, inc, sc in next 17 st, inc, sc in next 16 st [53]
R 36: sc in all 53 sts [53]
R 37: sc in next 26 st, inc, sc in next 26 st [54]
R 38: sc in all 54 sts [54]
R 39: sc in next 17 st, inc, sc in next 18 st, inc, sc in next 17 st [56]
R 40: sc in all 56 sts [56]
R 41: sc in next 27 st, inc, sc in next 28 st [57]
R 42: sc in all 57 sts [57]
R 43: sc in next 18 st, inc, sc in next 19 st, inc, sc in next 19 st [59]
R 44: sc in all 59 sts [59]
R 45: sc in next 29 st, inc, sc in next 29 st [60]
R 46: sc in all 60 sts [60]
Hat
R 1: sc in next 2 st, inc, sc, [inc, sc in next 2 st]*3, inc, sc, inc, sc in next 2 st [24]
R 2-3: sc in all 24 sts [24]
R 4: sc in next 5 st, inc, sc in next 6 st, inc, sc in next 5 st, inc, sc in next 2 st [27]
R 5-6: sc in all 27 sts [27]
R 7: [sc in next 6 st, inc]*3, sc in next 6 st [30]
R 8-9: sc in all 30 sts [30]
R 10: sc in next 7 st, inc, sc in next 14 st, inc, sc in next 7 st [32]
R 11-12: sc in all 32 sts [32]
R 13: sc in next 8 st, inc, sc in next 14 st, inc, sc in next 8 st [34]
R 14-16: sc in all 34 sts [34]
R 17: sc in next 9 st, dec, sc in next 12 st,dec, sc in next 9 st [32]
R 18: sc in all 32 sts [32]
R 19: sc in next 9 st, dec, sc in next 10 st,dec, sc in next 9 st [30]
R 20: sc in all 30 sts [30]
R 21: sc in next 5 st, dec, [sc in next 4 st, dec]*3, sc in next 5 st [26]
R 22: [sc in next 4 st, dec, sc in next 3 st, dec]*2, sc in next 4 st [22]
R 23: [sc in next 3 st, dec]*2, sc in next 2 st, [dec, sc in next 3 stc]*2 [18]
R 24: [sc in next 2 st, dec]*4, sc in next 2 st [14]
R 25: [sc in next st, dec]*4, sc in next 2 st [10]
R 26: sc, dec*4, sc [6]
R 27: dec*3 [3]
R 28: Join and bind off.
And it’s almost down, to make your cape more attractive, slip stitch along or use any edging in contrast color to make it outstanding. Wish it helps and have fun there.
The written pattern is based on my personal understanding and my way of non professional of US crochet terms, if you have any suggestions, please comment to upgrade so everyone can enjoy this beautiful cardigans for Spring and Summer.
Thank you for sharing my patterns and tutorials. When you do, it helps support this site and my ability to create more free patterns.
Please do not sell the actual pattern. I am offering the pattern for free to all that stumble across my site and would prefer it remain free for everyone.
You can sell your completed items made from my pattern/tutorial. In exchange, I ask that you link back to this post page. Do not use my photos as your own sales photos. Do not distribute my patterns/templates as your own.
Permission is not granted for mass production or factory manufacturing of any kind.